Customising Line Items in Sitecore Experience Commerce - Part 1 (Engine)
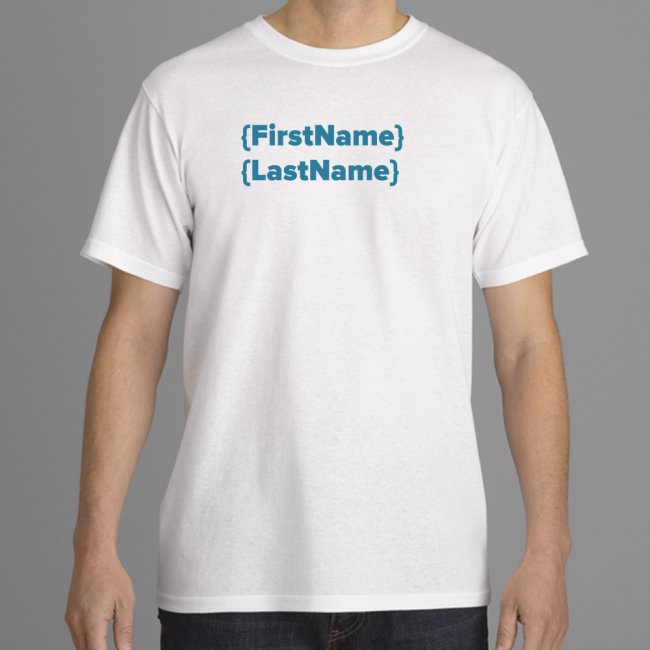
Sometimes the products that we are selling need to have custom information on each line item, and it’s a fairly straightforward process in Sitecore Experience Commerce to achieve this.
The steps for the engine are:
- Create a custom line item component that will store the extra data
- Create new controller with new endpoint(s) to save cart line data
- Create a ServiceApiBlock that will wire up the odata endpoint to your controller
- Create a ConfigureSitecore class to tell the engine what needs to be configured.
- Test it
The component
First, we’ll create a new component with a single field where the custom line item data will be stored. This will be persisted as a child component of the line item.
Components/LineItemPersonalisationComponent.cs
using Sitecore.Commerce.Core;

namespace MyCompany.MyProject.Plugin.Cart.Components.CartLine
{
    public class LineItemPersonalisationComponent : Component
    {
        public string PersonalMessage { get; set; }
    }
}
The controller
Next, we’ll create the controller that will implement the line item saving logic, including our new field(s). The name CommandsController is a convention and will be automatically registered by the engine. Make sure that the method name in the controller exactly matches the name in the route attribute and the name declared in the ServiceApiBlock.
Controllers/CommandsController.cs
using System;
using System.Linq;
using System.Threading.Tasks;
using System.Web.Http.OData;
using Microsoft.AspNetCore.Mvc;
using MyCompany.MyProject.Plugin.Cart.Commands;
using MyCompany.MyProject.Plugin.Cart.Components.CartLine;
using Sitecore.Commerce.Core;
using Sitecore.Commerce.Plugin.Carts;

namespace MyCompany.MyProject.Plugin.Cart.Controllers
{
    public class CommandsController : CommerceController
    {
        public CommandsController(IServiceProvider serviceProvider, CommerceEnvironment globalEnvironment)
        : base(serviceProvider, globalEnvironment)
        {
        }

        [HttpPut]
        [Route(Constants.RouteNames.AddPersonalisedCartLine + "()")]
        public async Task<IActionResult> AddPersonalisedCartLine([FromBody] ODataActionParameters value)
        {
            //Note the Route name above MUST match the actual name of the method.
            if (!ModelState.IsValid || value == null)
                return new BadRequestObjectResult(ModelState);

            if (!DataHasRequiredKeys(value,
                Constants.RouteParameters.CartId,
                Constants.RouteParameters.ItemId,
                Constants.RouteParameters.Quantity))
            {
                return new BadRequestObjectResult(value);
            }

            if (!Decimal.TryParse(value[Constants.RouteParameters.Quantity].ToString(), out var quantity))
            {
                return new BadRequestObjectResult(value);
            }

            var cartId = value[Constants.RouteParameters.CartId].ToString();
            var itemId = value[Constants.RouteParameters.ItemId].ToString();

            CartLineComponent line = new CartLineComponent()
            {
                ItemId = itemId,
                Quantity = quantity
            };

            var message = value[Constants.RouteParameters.PersonalMessage]?.ToString();

            //Add the custom data to the line item.
            line.ChildComponents.Add(new LineItemPersonalisationComponent() { PersonalMessage = message });

            var command = Command<AddCartLineCommand>();

            var cart = await command.Process(CurrentContext, cartId, line).ConfigureAwait(false);
            return new ObjectResult(command);
        }

        [HttpPatch]
        [Route(Constants.RouteNames.UpdatePersonalisedCartLine + "()")]
        public async Task<IActionResult> UpdatePersonalisedCartLine([FromBody] ODataActionParameters parameters)
        {
            if (!ModelState.IsValid || parameters == null)
            {
                return new BadRequestObjectResult(ModelState);
            }

            if (!DataHasRequiredKeys(parameters,
                Constants.RouteParameters.CartId,
                Constants.RouteParameters.CartLineId,
                Constants.RouteParameters.Quantity))
            {
                return new BadRequestObjectResult(parameters);
            }

            var cartId = parameters[Constants.RouteParameters.CartId].ToString();
            var cartLineId = parameters[Constants.RouteParameters.CartLineId].ToString();

            if (!Decimal.TryParse(parameters[Constants.RouteParameters.Quantity].ToString(), out var quantity))
            {
                return new BadRequestObjectResult(parameters);
            }

            var personalMessage = parameters[Constants.RouteParameters.PersonalMessage]?.ToString();

            var command = Command<UpdatedPersonalisedCartLineCommand>();
            var cart =
            await command.Process(CurrentContext, cartId, cartLineId, quantity, personalMessage)
                .ConfigureAwait(false);
            return new ObjectResult(command);
        }

        private bool DataHasRequiredKeys(ODataActionParameters parameters, params string[] fieldNames)
        {
            return fieldNames.All(field => parameters.ContainsKey(field)
                && !string.IsNullOrEmpty(parameters[field]?.ToString()));
        }
    }
}
This code is almost exactly what can be decompiled from Sitecore.Commerce.Plugin.Carts.dll with the addition of the personalMessage field and component, and I tidied up the validation of the required fields into a separate reusable method.
The AddPersonalisedCartLine method will handle adding a new item to the cart and will insert our new personalisation component on to each line item. Note that by default, the engine has a policy to roll up line items (ie, just add an extra quantity, rather than a new line item each time the user adds another one to the cart). For this reason, the default behaviour you will see is that the first item will add the new component, but subsequent items with the same sellable item/variant ID added to the cart will only increase the quantity, not change the message.
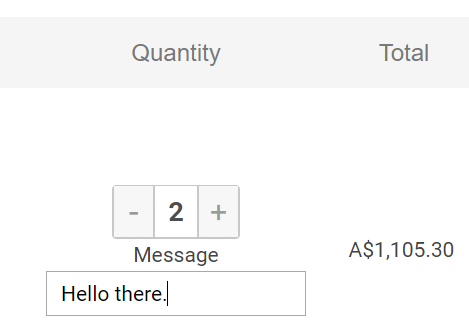
The UpdatePersonalisedCartLine method will handle updates such as changing the quantity by entering a new value. Similarly, if a field is provided for the user to change the message, it will be applied here. The inputs on the cart page might look something like this:
As with the add method, if the line item roll up policy is in effect, you may get undesirable results because your message will only be applied once to all line items with the same sellable item/variant ID.
The ServiceApiBlock
That’s most of the work done now. Once we have the controller, we wire it up to the odata end point and tell it what parameters to expect. Once again most of this is extracted from the carts dll and cleaned up with the message field added.
ConfigureServiceApiBlock.cs
using System;
using System.Threading.Tasks;
using Microsoft.AspNetCore.OData.Builder;
using Sitecore.Commerce.Core;
using Sitecore.Commerce.Core.Commands;
using Sitecore.Framework.Conditions;
using Sitecore.Framework.Pipelines;

namespace MyCompany.MyProject.Plugin.Cart
{
    [PipelineDisplayName("MyCompany.MyProject.Plugin.Cart.ConfigureServiceApiBlock")]
    public class ConfigureServiceApiBlock
    : PipelineBlock<ODataConventionModelBuilder, ODataConventionModelBuilder, CommercePipelineExecutionContext>
    {
        public override Task<ODataConventionModelBuilder> Run(ODataConventionModelBuilder modelBuilder,
            CommercePipelineExecutionContext context)
        {
            Condition.Requires(modelBuilder).IsNotNull("The argument can not be null");

            modelBuilder.AddEntityType(typeof(Sitecore.Commerce.Plugin.Carts.Cart));
            modelBuilder.EntitySet<Sitecore.Commerce.Plugin.Carts.Cart>("Carts");

            var addActionConfig = modelBuilder.Action(Constants.RouteNames.AddPersonalisedCartLine);
            addActionConfig.Parameter<string>(Constants.RouteParameters.CartId);
            addActionConfig.Parameter<string>(Constants.RouteParameters.ItemId);
            addActionConfig.Parameter<Decimal>(Constants.RouteParameters.Quantity);
            addActionConfig.Parameter<string>(Constants.RouteParameters.PersonalMessage);
            addActionConfig.ReturnsFromEntitySet<CommerceCommand>("Commands");

            var updateActionConfig = modelBuilder.Action(Constants.RouteNames.UpdatePersonalisedCartLine);
            updateActionConfig.Parameter<string>(Constants.RouteParameters.CartId);
            updateActionConfig.Parameter<string>(Constants.RouteParameters.CartLineId);
            updateActionConfig.Parameter<Decimal>(Constants.RouteParameters.Quantity);
            updateActionConfig.Parameter<string>(Constants.RouteParameters.PersonalMessage);
            updateActionConfig.ReturnsFromEntitySet<CommerceCommand>("Commands");

            return Task.FromResult(modelBuilder);
        }
    }
}
This will make our new endpoint available in the API, and include our message field. Note that the message field is required, even if it’s empty.
ConfigureSitecore
Lastly, we need a ConfigureSitecore so that we can add our ConfigureServiceApiBlock to the correct pipeline.
ConfigureSitecore.cs
using System.Reflection;
using Microsoft.Extensions.DependencyInjection;
using Sitecore.Commerce.Core;
using Sitecore.Framework.Configuration;
using Sitecore.Framework.Pipelines.Definitions.Extensions;

namespace MyCompany.MyProject.Plugin.Cart
{
    public class ConfigureSitecore : IConfigureSitecore
    {
        public void ConfigureServices(IServiceCollection services)
        {
            var assembly = Assembly.GetExecutingAssembly();
            services.RegisterAllPipelineBlocks(assembly);

            services.Sitecore().Pipelines(config => config
                       .ConfigurePipeline<IConfigureServiceApiPipeline>(configure =>
                           configure.Add<ConfigureServiceApiBlock>()));

            services.RegisterAllCommands(assembly);

        }
    }
}
Test it
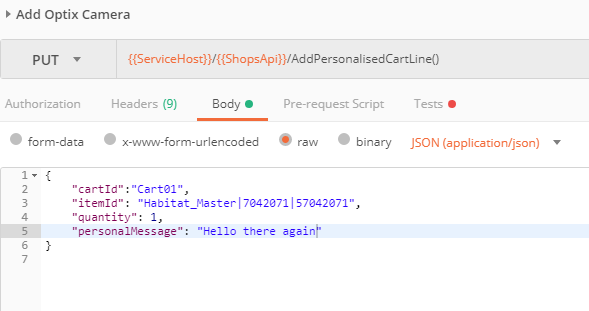
Finally we can build and test the solution. In postman, we can use the pre-built add to cart from the SDK postman scripts, replacing the default path with our new end point.
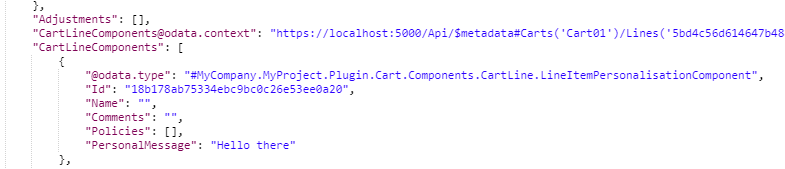
And using the get cart script, we should see the new component on the line item that was added.
Don’t forget to rebuild the Service Proxy to add the new goodness so that it can be used in the Storefront.
The complete code is available here.
The next post will cover the changes required in Core and Connect to make the customisation usable in the storefront.